Starting a Compost Bin

With fall comes several different activities, including cleaning the garden, raking up excess leaves, and possibly preserving the last of your fall produce. With all that plant material available, fall can be the perfect time to start a compost pile. Compost is nature’s way of transforming organic material into a form usable to plants. Compost, by definition, is a mix of soil and rotted or decomposed organic material that has been transformed into material usable by plants by bacteria, fungi, microorganisms, and air. Once it has decomposed, this organic material can be incorporated into vegetable gardens, as a thin layer in lawns, and used as mulch in flower beds. Compost is created using a combination of “brown” and “green” materials with beneficial decomposers, moisture, and air (more on that later). In nature, composting is a slow process; however, with proper planning, composting can be a relatively quick process in the home garden.
When planning a compost bin, the first step is to figure out where to put it. While compost piles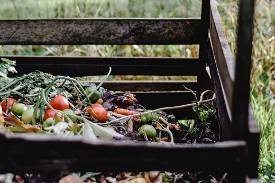 need to stay damp to encourage faster decomposition, the bin should not be in an area that stays consistently wet or holds water. Most people put their bins in an easily accessible but out-of-the-way location near their garden or flower beds. Having a water source nearby is beneficial to keep the organic material damp, but that is not a requirement. Composting can be made in a pit, using a bin, or using a compost tumbler. How you compost will ultimately be up to your personal preferences and the material you produce. Growing up, we had a big compost pile that we threw organic material on, and my dad would turn it with a skid steer periodically to facilitate the breaking down of material in the back. A compost pile should be enclosed to keep pets out of the material. One of the cheapest bins uses wooden pallets similar to the photo above; however, woven wire, cement bricks, or other lumber works just as well. Commercial compost bins or tumblers that work equally are also available. Many people have multiple bins side by side and move the compost from one bin to another as it decomposes, similar to the photo above.
 Once you have determined the location of your compost pile and built it, it's time to start composting. Compost should consist of "brown" and "green" materials. Brown materials provide the carbon needed in the pile. These materials are usually dry, so we call them brown, and provide air movement and food for the decomposers to eat on. Brown materials consist of leaves, straw, sawdust, dryer lint, pine needles, etc. You should have at least twice as many browns as you have greens. Green materials provide the nitrogen needed to feed the decomposers. They help the decomposers grow and multiply. These materials include grass clippings, kitchen waste (egg shells, peelings, scraps), flowers, coffee grounds, hair, manure, and weeds (without seeds). Several items should never be added to the compost pile as they can lead to animals getting in the pile or disease and insect issues in the future. These include diseases or insect-infested plants, pet waste, meat or dairy products, weeds with seeds, and poisonous plants.
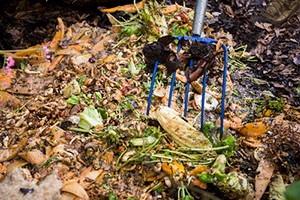
There are two methods of composting: hot composting and cold composting. Hot composting is the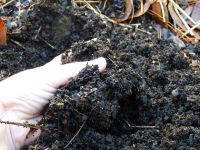 faster method; however, it involves collecting the materials needed to create a pile all at once, while cold composting takes longer but can be more user-friendly by throwing materials into the pile as you have them and not layering the materials. To start a hot compost pile, collect all the materials and then follow this pattern: Start the pile with a six to eight-inch layer of brown materials on the bottom of the pile, then add a two to three-inch layer of green materials and repeat until you have a pile approximately three feet by three feet. If green materials are in short supply, you can sprinkle manure or a high-nitrogen fertilizer throughout the pile to add the necessary food for the decomposers. Water the pile in a well every week if it doesn't rain. Watch the pile's temperature; it should slowly rise to approximately 150-160 degrees and then slowly decrease. Once it cools down, turn the pile using a pitchfork, which should cause it to heat up again. A hot compost pile should be ready in four to six months. Cold composting takes longer, up to a year. However, you can add to the pile whenever you like. Keep the browns to greens at a ratio of 2 to 1, and keep the pile damp while turning it periodically. The compost is ready to use when there is no recognizable plant material, and the organic matter is dark brown and crumbly.